Blog
Turn Any WhatsApp Number Into an AI ChatBot with No-code (No Meta Setup Required)
Tutorial
·
Jun 19, 2025
Are you tired of the endless hoops you need to jump through to create a WhatsApp bot? The Meta developer platform requirements can be overwhelming - business verification, app creation, and purchasing a dedicated business phone number just to get started.
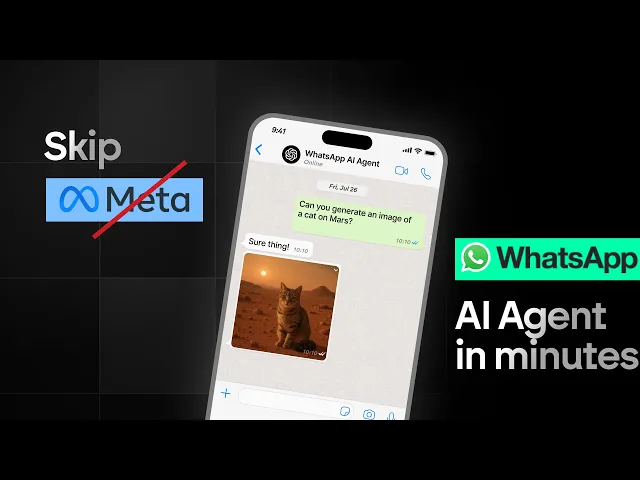
What if you could turn any WhatsApp number (even your spare personal one) into a fully functional AI bot in minutes? No Meta business approval. No Facebook verification. No complex setup. Just scan a QR code and you're ready to go.
In this guide, I'll show you how to create a WhatsApp AI bot that can:
- Respond to messages 24/7 with AI-generated text
- Create and send AI-generated images based on user prompts
- Work with any existing WhatsApp number
Let's remix the template before we start!

The Traditional WhatsApp Bot Problem
Setting up a WhatsApp bot through Meta’s official channels can be a hassle. You’ll need to create a developer account, set up and verify a business app, go through Facebook’s business verification process, purchase and register a WhatsApp business number, and wait for Meta’s approval—just to get started.
Even with test phone numbers, you're limited - only verified users can message your bot. Not exactly ideal for a customer-facing solution.
The Easier Way: WhatsApp Sender API + BuildShip
Instead of the official Meta route, we can use a WhatsApp sender API service combined with BuildShip's automation platform to create a powerful bot with minimal setup.
Here's what you'll need:
- A spare WhatsApp number (or any number you want to turn into a bot)
- A WhatsApp sender API account
- A BuildShip account
Step 1: Connect Your WhatsApp Number
First, we'll connect your WhatsApp number to the sender API:
1. Create an account with a WhatsApp sender API service
2. Create a new WhatsApp session
3. Enter your phone number
4. Enable webhook notifications (we'll set the URL in the next step)

5. Scan the QR code with your WhatsApp app

That's it! Your number is now connected and ready to be automated.
Step 2: Create Your BuildShip Workflow
Now we'll create the automation flow that powers your bot:
1. Create a new flow in BuildShip
2. Add a REST API trigger (this will receive messages from WhatsApp)
3. Copy the webhook URL from BuildShip

4. Go back to your WhatsApp sender API and paste the webhook URL

5. Enable the "message.received" event

At this point, your WhatsApp number is connected to BuildShip, but we need to build the logic that will process messages and generate responses.
Step 3: Build Your Message Processing Flow
When someone sends a message to your WhatsApp number, it will be forwarded to your BuildShip workflow. Here's how to process it:
1. Extract the message text from the webhook payload
2. Generate a response using AI (text or image)
3. Send the response back to the user
Let's break down each step:
Extracting the Message
The webhook payload contains the message in a nested structure. We need to extract just the text content:
```javascript
// Extract message from webhook payload
const extractMessage = (event) => {
try {
return event.data.conversation.messages[0].text;
} catch (error) {
return "Could not extract message";
}
};
```
Generating AI Responses
For text responses, we can use a language model like GPT or Claude:
1. Add an AI text generator node (Claude or GPT)
2. Set a system prompt (e.g., "Be helpful and concise")
3. Pass the extracted message as the user prompt

For image responses:
1. Add a GPT image generator node
2. Use the extracted message as the image prompt
3. Add a file upload node to get a public URL for the generated image

Sending Responses Back
Finally, we need to send the response back to the user:
1. Add a "Send WhatsApp Message" node
2. Configure it with your API key
3. Set the recipient's phone number
4. Pass in your AI-generated text or image URL

The Complete Flow
Your complete BuildShip workflow will look something like this:
1. REST API trigger receives webhook from WhatsApp
2. Extract message text from the payload
3. Generate response with AI (text or image)
4. If generating an image, upload it to get a public URL
5. Send the response back to the user's WhatsApp
For a complete video guide, please click below:
What Can You Do With Your WhatsApp AI Bot?
Once your WhatsApp bot is set up, it unlocks a wide range of possibilities - from acting as a 24/7 customer support agent and qualifying leads through conversational AI, to generating images on demand, serving as a personal assistant, or even functioning as an educational tutor.
Beyond Text: Multimodal Capabilities
Your WhatsApp bot goes far beyond basic text replies. With the right workflow, it can generate and send AI images from user prompts, process and respond to incoming images, and deliver rich, formatted messages including links and more.
Conclusion
What we've accomplished here is remarkable - transforming any WhatsApp number into a fully functional AI bot without the traditional hurdles of Meta's business approval process.
This approach is ideal for quick prototyping, personal projects, and small businesses looking for a simple yet powerful WhatsApp automation solution. It’s also great for anyone who wants to experiment and explore the possibilities of building AI-driven bots without heavy setup.
Remember that while this method is quick and easy, it's designed for personal or small-scale use. For enterprise-level deployments handling sensitive data or high message volumes, you might eventually want to consider the official WhatsApp Business API.
Ready to create your own WhatsApp AI bot? Clone our template and start building today!


