
Are you tired of constantly checking your Google Forms for new responses? Do you wish there was an easier way to get email notifications on an app of your choice?
One of the easiest ways to get email notifications for Google Form submissions is by using the built-in feature provided by Google. By default, new responses are automatically stored in your Google account's "Form Responses" section.
From conducting surveys, managing event registrations, collecting feedback, to acquiring customer information, the use cases of Google Form responses are vast and diverse. However, the true power lies in leveraging these responses beyond the form itself.
Imagine easily transforming these raw inputs into actionable insights or automated processes. BuildShip let’s you do just that. Connect your Google Forms responses with any 3rd party integration, AI Model, Database and more in low-code with BuildShip.
Automating your Google Form Responses
In this article, we will explore how you can automate the process of receiving notifications for Google Form submissions as a message in a Discord server, ensuring that you never miss a new response again. We also have a BuildShip template that you can remix in case you want to play around.
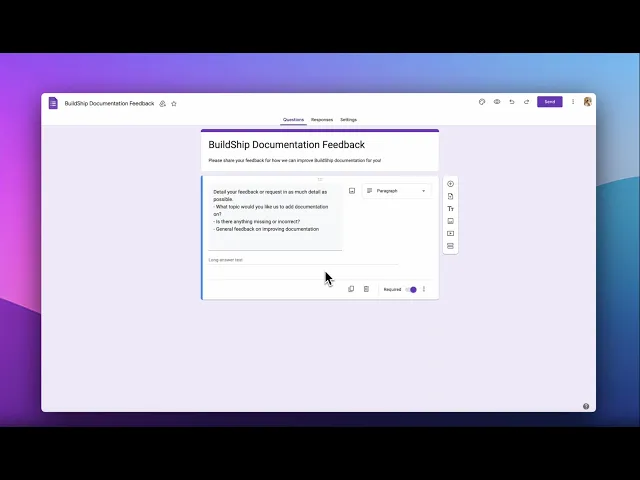
Step 1: Create and setup your Google Form
Go to Google Forms and create your own Google Form. Or, if you already have your Google Form ready, simply proceed with the next step.
In your form dashboard, click on the Form Menu, next to the “Send” button, and go to the “Script Editor”.
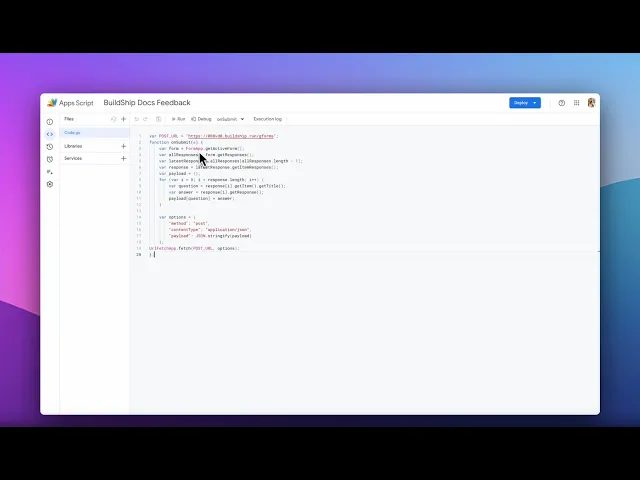
This will open the Apps Script project. Replace the boilerplate function with the following script:
Let’s go to BuildShip and get our Webhook URL to replace in the above script.
Step 2: Add Webhook URL to handle submissions
We need a webhook URL where an API call will be done every time a new submissions come through via your Google Forms. We’re gonna be building this webhook API using BuildShip - a visual way of building backend workflows and APIs with low-code and AI. For a quick introduction to BuildShip, check out our 5-minute product walkthrough video or Documentation.
To create the webhook API url complete this:
First, go to BuildShip App and create an account if you haven’t already - it’s free!
Click on the ✚ button to create a new workflow. This will open up a blank canvas for you to start building.

Click on “Add Trigger” button. This will let you pick a starting point for your workflow. In this example, we need to add the Rest API Call Trigger. (Read more about REST API Call Trigger.)
Once the trigger is added, you can set a path for your API Endpoint, for example, say
gforms. For the HTTP Method, selectPOSTas the Google Forms will be sending a POST request to our webhook endpoint with the responses as the request body.
Next, we’ll be looking into building a notification system for the Google Forms responses. Let’s copy the Endpoint URL for the workflow by clicking on the Link Icon 🔗 on the trigger. Go to the Google Forms Script Editor and replace the POST URL on line 1.

Step 3: Take action on Google Form Responses
Next, we’ll be looking into sending the Google Responses we get for this form as messages to a Discord Text Channel. You can take any action here using BuildShip - be it sending to Slack, email notification or a database - you can full flexibility with prebuilt nodes or AI generated low-code.
3.1 Setting up a Discord Webhook Bot
NOTE: Make sure you have the required ADMIN permissions to the Discord Server to create a Text Channel and set up Webhooks.
Let’s go to our Discord Server and create a new text channel and give it a name you prefer.
Go to the Channel Settings and navigate to “Integrations”. Click on “Add Webhook” and give your Webhook an appropriate name. (Or optionally, leave it to the default name.)

Click on “Copy the Webhook URL” and let’s go back to our BuildShip Dashboard…
3.2 Configuring the Discord Webhook on BuildShip
Let’s come back to the workflow where we have set up out REST API Call Trigger.
Click on the ✚ icon on the trigger to add a node. This opens up the BuildShip Node Library.
Search for the “Discord Webhook Bot” Node and add it to the workflow.
Paste the copied Discord Webhook URL in the “Webhook URL” input.
For the “Content”, click on the Edit ✎ icon and paste the following logic to get the response for the first question in your Google Form.
QUICK TIP 💡: Feel free to modify the the above script to access the values for other questions simply by changing the array index. This let’s you retrieve the values for all questions irrespective of their key, as GForms use the question as the key.

Click on the “Ship” button. Now your workflow is successfully deployed! 🚀
Now there’s one last thing to do before we’re done and that is setting the GForm Trigger from the Google Apps Script Console.
Step 4: Complete the Setup on Google Forms, that's it 🥳
Let’s go back to the Google Apps Script console where we added a script for sending a POST request to out Endpoint URL.
Go to the side menu and click on “Triggers” and click on the “Add Trigger” button.
Change the Event Type to
On Form Submitand rest keep all the default values. Hit “Save”.Grant permissions as prompted and wait for the trigger to be deployed.
And, we’re done!
End to End Testing
Submit Form, see the notification
Anytime a response is added for the Google Form, your workflow should be triggered.
Click on the “Executions” tab in the side menu to check the Cloud Logs for all the executions.

Customize this for any usecase
This example showed how to connect your Google Form responses to be displayed as notifications in your Discord Server. Users can easily modify the logic to change the integration from Discord Webhook Bot to any other platforms of their choice - Slack, Telegram, WhatsApp.
Users can even turn this workflow to save the Form Responses to a database - Firestore, Supabase, MySQL, Postgres, etc.


