Blog
How To Integrate Supabase Cloud Functions With No Code Visually Using BuildShip
Tutorial
·
Dec 7, 2023

The world of software development constantly evolves, and today we will witness the full potential of low-code in action. In this blog post, we will explore the process of creating and implementing cloud functions for Supabase using BuildShip, a powerful low-code platform.
With BuildShip, you can visually develop backend logic and integrate with leading AI models and third-party services like Supabase, all without needing to write a single line of code.
What is Supabase?
Supabase is one of the favorite tools for developers worldwide. It is an open source software as a service, and provides hosted backend services such as Postgres database, authentication, and file storage. Supabase also has an extensive documentation for almost every use case required to make the development process faster.

Supabase projects can be integrated with all-time favorite tools such as MySQL and TypeScript, catering to developers' preferences and requirements. Through OAuth2-powered platforms like Appsmith, Supabase users can efficiently authenticate and authorize requests, ensuring enhanced security and privacy for their applications.
With BuildShip’s ability to build robust backend APIs and Supabase platform's flexibility, developers can handle a large number of users without compromising speed or performance. Supabase's strong focus on popular database integrations and the drop-in nodes from BuildShip further enhances scalability, allowing developers to easily connect with their preferred databases and existing assets.
Supabase vs Firebase
When considering backend solutions, the comparison between Supabase and Firebase often arises. Both Supabase and Firebase offer integration options for applications. They share the convenience of setting up projects directly in the browser and provide real-time data monitoring through user-friendly dashboards.
Firebase operates as a document store, while Supabase leans on PostgreSQL, a robust SQL-based relational database management system. This foundational difference can significantly impact data handling and structure for developers.
While BuildShip supports integrations for both platforms, this blog will specifically explore integrating Supabase into your backend workflow.
Building a Workflow with Supabase and BuildShip
To demonstrate the capabilities of BuildShip, we will create a workflow that is triggered whenever a new row is inserted into a Supabase table. Our ultimate objective is to summarize and classify the large text content within the newly inserted row.
Let's dive into the step-by-step process.
Selecting the Trigger
In BuildShip, we start by creating a brand new workflow. The first step is to select a trigger. For this example, we choose the REST API call trigger, which will kick off the execution of our workflow. Once deployed, we will obtain a publicly accessible API endpoint to connect with Supabase.

Adding the Cohere Integration Nodes
We now move on to adding the Cohere integration nodes to summarize and classify the large text content from the Supabase requests in parallel. Adding a parallel node allows both nodes to be executed simultaneously, improving efficiency and reducing execution time.

Cohere Text Summarizer Node
The first node we add is the Cohere Text Summarizer. We input our Cohere API key and extract the large text field from the request body. We set the length of the summarized text to short and the format to a paragraph. Additionally, we adjust the temperature to 0.7 for optimal results.

QUICK TIP 💡: Make sure to save your sensitive data like API Keys in the BuildShip Secret Manager. Learn more how to secure your keys with BuildShip here.
Cohere Classify Node
Next, we add the Cohere Classify node. Similar to the previous one, we input our API key and pass the text we want to classify as an array item. We use the large text from the request body and provide a set of classification examples to provide context to the model.

Adding Supabase Integration
Moving forward, we focus on adding the Supabase node to update the appropriate row with the values generated by the Cohere nodes.
Navigate to the Supabase group within the nodes library and select the Update Supabase Row node.

Configure the node by setting the API URL and the Supabase Secret Key obtained from the project settings.
Specify the row you want to update by adding a filter with the ID equal to the Row ID from the request body.

Finally, define the columns to update as an object, including the summary value returned from the Cohere Text Summarizer node and the first item returned from the Cohere Classify node.

Returning Success Response
To indicate a successful execution of our workflow, we add a return node and set the status code to OK, with the value set to success.

Connecting BuildShip with Supabase
With the BuildShip workflow now complete, we can connect it to our Supabase table to start listening for changes in real-time. Here's how to set it up:
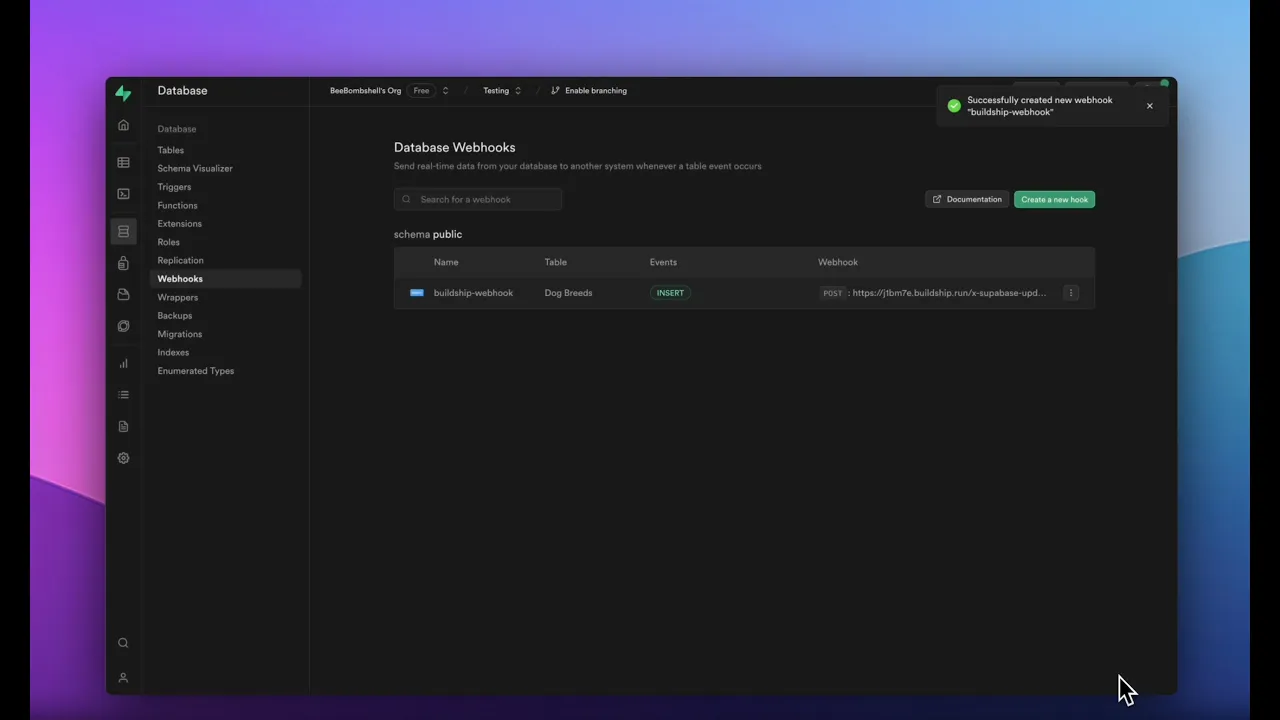
In Supabase, go to the webhook section and create a new webhook.
Provide a name, such as
buildship-webhook, and select the demo table you want to listen for changes on.Choose to listen for insert events only and set the webhook type to HTTP Request with the method as POST.
Retrieve the endpoint URL from your workflow in BuildShip and paste it in the URL field.
Save the webhook to enable real-time updates from your table.
Testing and Results
At this point, we have successfully set up the integration between BuildShip and Supabase. Let's test our setup by inserting a new row into Supabase. Upon saving the row, our BuildShip workflow will be triggered, summarizing and classifying the text, and updating the corresponding row with the generated values. This end-to-end process proves the efficiency and effectiveness of the BuildShip platform. Alternatively you can always view the backend code of each node by on the “</>” icon.
Conclusion
BuildShip offers an incredible low-code solution for building robust backend logic without the need for coding expertise. By integrating with popular services like Supabase, developers can create powerful workflows that automate tasks and leverage leading AI models.
With the ability to generate workflows using AI, the possibilities are endless. Experience the power of low-code with BuildShip and unleash your creativity in software development.
To learn more about BuildShip and its integrations, visit our website and start building without code today!


